How to make a DIY PC lamp cover?
As a supplier of PC Lamp Covers, I've witnessed the growing interest in DIY projects. Creating your own PC lamp cover can be a rewarding experience that combines creativity with functionality. In this blog, I'll guide you through the process of making a DIY PC lamp cover, sharing tips and tricks along the way.
Why Choose a PC Lamp Cover?
PC (Polycarbonate) is an excellent material for lamp covers. It offers high transparency, which allows light to pass through efficiently, creating a bright and even illumination. Additionally, PC is highly impact - resistant, making it durable and long - lasting. It can withstand minor bumps and knocks without cracking or breaking, ensuring your lamp cover will serve you well for a long time. Moreover, PC has good heat resistance, which is crucial as lamps can generate a significant amount of heat during operation.


Materials and Tools You'll Need
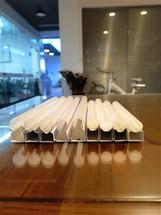
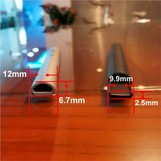
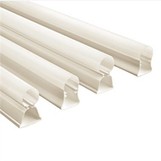
- PC Sheet: You can source a high - quality PC sheet from a local hardware store or order it online. Make sure to choose a sheet with the appropriate thickness for your lamp. Thicker sheets are more durable but may reduce the amount of light transmission slightly.
- Cutting Tools: A sharp utility knife or a jigsaw can be used to cut the PC sheet to the desired size and shape. If you're using a jigsaw, make sure to use a fine - tooth blade designed for cutting plastic.
- Measuring Tools: A measuring tape or a ruler is essential for accurate measurements. You'll need to measure the dimensions of your lamp base to ensure a proper fit for the lamp cover.
- Sandpaper: To smooth the edges of the cut PC sheet, you'll need some sandpaper. Start with a coarse - grit sandpaper and then finish with a fine - grit sandpaper for a polished look.
- Adhesive or Fasteners: Depending on your design, you may need adhesive or fasteners to attach the lamp cover to the lamp base. Silicone adhesive is a good choice as it is strong and flexible.
Step - by - Step Guide
Step 1: Measure and Plan
First, measure the dimensions of your lamp base. You need to determine the height, diameter (if it's a round lamp), or length and width (if it's a rectangular lamp). Based on these measurements, plan the shape and size of your lamp cover. You can draw a sketch on a piece of paper to visualize the final product. For example, if you have a round lamp, you might want to create a cylindrical lamp cover.
Step 2: Cut the PC Sheet
Using your chosen cutting tool, carefully cut the PC sheet according to your measurements. If you're using a utility knife, score the sheet multiple times along the cutting line and then snap it along the scored line. If you're using a jigsaw, clamp the PC sheet securely to a workbench and start cutting slowly and steadily. Remember to wear safety goggles and gloves to protect yourself during this process.
Step 3: Smooth the Edges
After cutting the PC sheet, the edges may be rough. Use the sandpaper to smooth the edges. Start with the coarse - grit sandpaper to remove any large burrs or rough spots. Then, switch to the fine - grit sandpaper to give the edges a smooth and polished finish. This will not only make the lamp cover look better but also prevent any injuries from sharp edges.
Step 4: Shape the Lamp Cover
If you're making a non - flat lamp cover, such as a cylindrical or a conical one, you'll need to shape the PC sheet. You can use a heat gun to soften the PC sheet slightly, making it more pliable. Be careful not to overheat the sheet, as this can cause it to warp or melt. Once the sheet is soft enough, carefully bend it into the desired shape and hold it in place until it cools and retains the shape.
Step 5: Attach the Lamp Cover to the Base
Depending on your design, you can use adhesive or fasteners to attach the lamp cover to the lamp base. If you're using silicone adhesive, apply a thin layer of adhesive to the edges of the lamp base where the cover will be attached. Then, carefully place the lamp cover on the base and press it firmly to ensure a good bond. If you're using fasteners, drill holes in the PC sheet and the lamp base and then use screws or bolts to secure them together.
Tips and Tricks
- Use Templates: If you're not confident in your free - hand drawing and cutting skills, you can create templates out of cardboard or paper. Cut the template to the desired shape and size, and then use it as a guide to cut the PC sheet.
- Test the Fit: Before attaching the lamp cover permanently, test the fit by placing it on the lamp base without using adhesive or fasteners. Make any necessary adjustments to ensure a perfect fit.
- Add Decorations: You can add some personal touches to your DIY PC lamp cover. For example, you can use a permanent marker to draw patterns or designs on the cover, or you can attach small decorative elements such as beads or sequins.
Where to Source Materials
As a PC Lamp Cover supplier, I understand the importance of sourcing high - quality materials. If you're looking for plastic profiles for your lamp cover project, you can visit Plastic Profile. This website offers a wide range of plastic profiles that can be used in various DIY projects.
For more information about PC Lamp Covers, including different styles and sizes, you can check out PC Lamp Cover. Here, you'll find detailed product descriptions and specifications to help you choose the right PC lamp cover for your needs.
If you're interested in PVC pipe extrusion for your lamp cover project, PVC Pipe Extrusion provides valuable information about the process and the available products.
Contact for Procurement
If you're interested in purchasing PC lamp covers in bulk or have any questions about our products, we welcome you to contact us for procurement and further discussion. We are committed to providing high - quality products and excellent customer service. Whether you're a DIY enthusiast looking for materials or a business in need of large - scale supplies, we can meet your requirements.
References
- "Plastic Materials Handbook" by John Murphy
- "DIY Lighting Projects" by Sarah Thompson
- Online resources from plastic material manufacturers and DIY communities