Repairing a cracked lamp cover plastic can be a practical and cost - effective solution rather than immediately replacing the entire cover. As a Lamp Cover Plastic supplier, I've witnessed the importance of being able to repair these covers, not only to save money but also to reduce waste. In this blog, I'll guide you through the steps of how to repair a cracked lamp cover plastic.
Assessing the Damage
The first step in any repair process is to assess the damage. Carefully examine the cracked lamp cover. Determine the size, location, and depth of the crack. Minor surface cracks might be easier to repair compared to deep, long, or multiple cracks. If the crack is on a visible part of the cover, you may need to pay more attention to the aesthetic aspect of the repair. Also, check if the plastic is brittle or flexible. Different types of plastics require different repair methods. For instance, a rigid PVC plastic may need a different adhesive or technique than a more flexible polycarbonate plastic.


Gathering the Necessary Tools and Materials
Once you've assessed the damage, it's time to gather the tools and materials needed for the repair. Here's a list of common items you might require:
- Adhesive: Depending on the type of plastic, you'll need an appropriate adhesive. For most plastics, a cyanoacrylate (super glue) can work well for small cracks. However, for larger or more structural repairs, a two - part epoxy might be more suitable. Epoxy provides a stronger bond and can fill in gaps more effectively.
- Sandpaper: Different grits of sandpaper, such as 120 - grit and 220 - grit, are useful for preparing the surface of the plastic. Sanding helps the adhesive bond better by creating a rough surface.
- Cleaning agents: Use a mild detergent and water to clean the cracked area. This removes any dirt, dust, or grease that could prevent the adhesive from bonding properly. You can also use isopropyl alcohol to further degrease the surface.
- Masking tape: This can be used to hold the cracked parts together while the adhesive dries. It also helps in keeping the repair area clean and preventing the adhesive from spreading to unwanted areas.
- Putty knife or spatula: If you're using epoxy, a putty knife or spatula is handy for applying the adhesive evenly and filling in the crack.
Preparing the Surface
Before applying any adhesive, it's crucial to prepare the surface of the cracked plastic. Start by cleaning the area with a mild detergent and water. Use a soft cloth to gently scrub the crack and the surrounding area. Rinse thoroughly and dry with a clean cloth.
Next, use sandpaper to lightly sand the cracked area. Start with the 120 - grit sandpaper to create a rough surface. This increases the surface area for the adhesive to bond to. After sanding with the 120 - grit sandpaper, switch to the 220 - grit sandpaper to smooth out the rough edges and create a more even surface. Wipe away any dust created by sanding with a clean, dry cloth.
Applying the Adhesive
Now that the surface is prepared, it's time to apply the adhesive. If you're using super glue, carefully apply a small amount of glue along the crack. Press the cracked parts together firmly and hold them in place for a few minutes until the glue starts to set. Be careful not to get the glue on your fingers, as it can bond skin quickly.
For a two - part epoxy, follow the manufacturer's instructions for mixing the two components. Usually, you'll need to mix equal parts of the resin and the hardener on a clean, disposable surface. Once mixed, use a putty knife or spatula to apply the epoxy into the crack. Fill the crack completely, making sure to press the epoxy into any gaps or voids. If the crack is large, you may need to build up the epoxy in layers, allowing each layer to dry slightly before applying the next.
After applying the adhesive, use masking tape to hold the cracked parts together. Make sure the tape is tight enough to keep the parts in place but not so tight that it squeezes out too much of the adhesive.
Drying and Curing
The drying and curing time depends on the type of adhesive you've used. Cyanoacrylate glue usually dries within a few minutes, but it's best to let it cure for at least an hour before handling the lamp cover. Two - part epoxy typically takes longer to cure. It may take several hours or even overnight, depending on the product.
During the curing process, keep the lamp cover in a dry, warm place. Avoid touching or moving the cover until the adhesive is fully cured. This ensures a strong and durable repair.
Finishing the Repair
Once the adhesive is fully cured, remove the masking tape. If there is any excess adhesive around the crack, use a sharp blade or sandpaper to carefully remove it. Sand the repaired area with fine - grit sandpaper to smooth it out and make it blend in with the rest of the lamp cover.
If the lamp cover has a glossy finish, you can use a plastic polish to restore the shine. Apply the polish according to the manufacturer's instructions, using a soft cloth to buff the surface.
Preventive Measures
To avoid future cracks in your lamp cover plastic, here are some preventive measures you can take:
- Handle with care: When installing or moving the lamp, be gentle with the cover. Avoid dropping or hitting it against hard surfaces.
- Avoid extreme temperatures: Plastic can expand and contract with temperature changes. Keep the lamp away from direct sunlight or heat sources, as excessive heat can cause the plastic to warp or crack.
- Regular maintenance: Clean the lamp cover regularly to prevent the buildup of dirt and debris. This helps in maintaining the integrity of the plastic.
Our Products for Lamp Covers
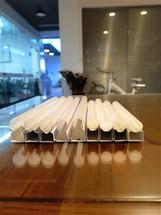
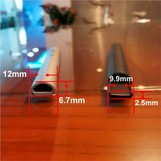
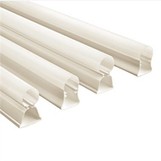
As a Lamp Cover Plastic supplier, we offer a wide range of high - quality products. Our LED Light Plastic Cover is designed to provide excellent protection for LED lights. It's made from durable plastic that can withstand normal wear and tear. Our LED Plastic Cover is another popular option, offering a sleek and modern look. And if you're looking for a more unique option, our Plastic Transparent Tube can be used as a creative lamp cover.
Contact Us for Procurement
If you're interested in purchasing our lamp cover plastics or have any questions about our products, we encourage you to contact us for procurement discussions. Our team of experts is ready to assist you in finding the right solution for your needs. Whether you're a small business or a large - scale manufacturer, we can provide you with the high - quality products and excellent service you deserve.
References
- "Plastic Bonding Handbook" - A comprehensive guide on bonding different types of plastics.
- Manufacturer's instructions for adhesives and plastic products.
- Online resources on plastic repair and maintenance.